Automation Rules is the most powerful tool you can use to customize your experience with SeamlessDesk. It is designed to allow customization of conditions and actions that happen in your everyday operations tailored fit for your needs. Next time you find yourself asking “I wish SeamlessDesk had this feature” it probably does…within the ticket rules.
Grab some coffee and let’s dive in
Ticket Rules – rules that you can set depending on the condition that happens and the action you want to take based on those conditions. Let’s give you a quick example.
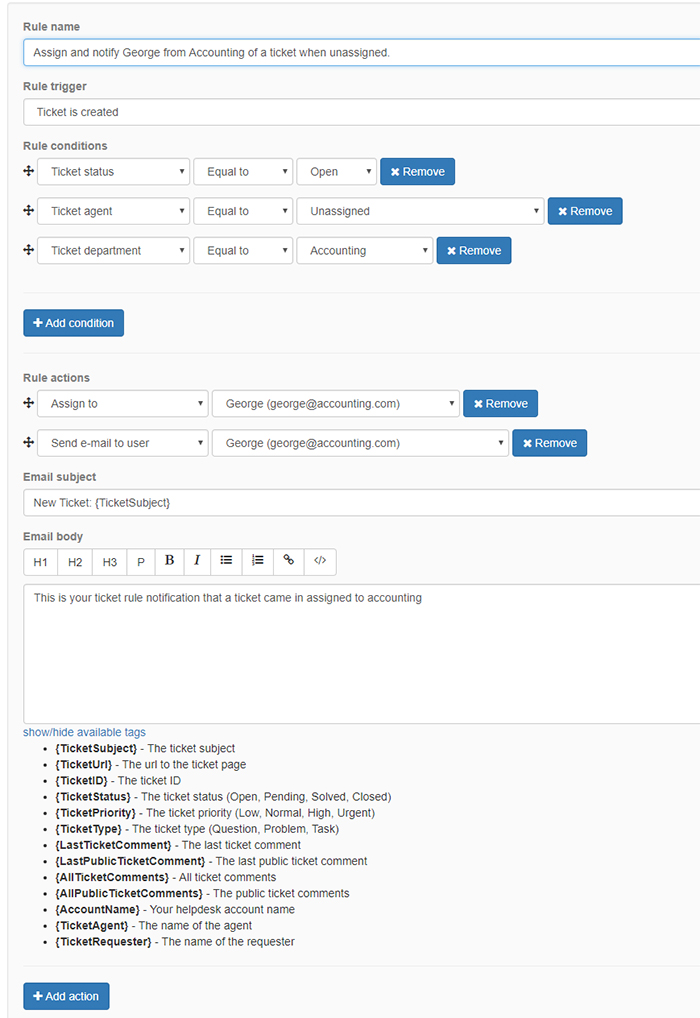
Let’s Say George from Accounting want’s every ticket that comes in unassigned AND is for the accounting department to be automatically assigned to him as well as send an email to him notifying him of the new assignment.
Sound complicated? Naw…it’s easy
Here is a quick example of what that would look like in a ticket rule.

Let’s break this down:
- Rule Name – Give your ticket rule a name so you can recognize it
- Rule Trigger – Since we want to execute this rule when the ticket is created we choose “Ticket is created”
- Rule Conditions – In the rule conditions, you can see we specified 3 conditions total. 1. The first condition we need to match is when a ticket is created and the status is open. Since all tickets first created are open this will trigger. Since potentially tickets can be created from other agents without being set to “open” you are better off having this condition. 2. Ticket agent is equal to unassigned, 3. Ticket Department is equal to Accounting. These are the conditions we need to have met in order for the actions to take place.
- Rule Actions – Actions are what we want to happen in the conditions are met. 1. Assign the ticket to George, 2. Send an email to user George.
There are many ways you can use these rules so we encourage you to poke around and see all the options you have available. When you created your account we went ahead and added some basic ones you will need to give you a heads start. You can check them out here.